Category Archives: moneypit

the moneypit, no 27: our houseiversary

wow. so, as of today we’ve been the caretakers of our moneypit for a full year. in honor of that year, i made Ben a little “happy houseiversary” e-card today:

houseiversary

I’m also going to take a moment to review our to-do list, just so we can see what we’ve accomplished in a year. after the contractors were done with the big stuff, (electrical, plumbing, drywall, roof, refinish floors, windows), here’s the list of stuff we managed to check off our own work list (in no particular order):

Fix leaky kitchen sink fixture
Fix gas line so stove can sit closer to the wall
Source, refinish and hang oak doors
Finesse floor grates
Source, repair and install mortise locks and deadbolts in all exterior doors
Cut and install corner cupboard shelves
True up cupboards
Tear out all the existing oak trim
Find replacement floor vent for 1st floor bathroom
Find 4mm pegs for bathroom shelves
Pick paint colors
Install shelves and clothing rods in 1st floor closets
Install mailboxes
Install programmable thermostats
Install hair catchers in all sinks/drains
Caulk bathrooms
Install moulding in 1st floor unit
Paint moulding
Touch up paint on 1st floor walls
Caulk around kitchen sinks
Clean/install door plates
Curtain rods over windows in 1st floor unit
Replace exhaust fan in 1st fl bathroom
Evict mouse from exhaust fan in 1st fl bathroom
Install handles on kitchen cupboards and drawers
Paint shelves in closets
Cut out mouldy drywall from back stairwell
Install towel bar, robe hook and toilet paper holder in st floor bathroom
Install pigeon spikes on 1st floor bathroom window ledge
Master bedroom closet built-ins
Coat rack on front landing
Shelves in garage
Unbend oven rack so it fits in the oven again
Extend tub faucet so trim plates can be installed
Patch remaining holes in bathroom tile around crooked spigot
Take a nap on the kitchen floor
Replace broken angle stop on toilet valve
Attach side of bathtub
Find and install basement store room shelves
Build bench for landing
Clean/install door plates
Install catch on 2nd floor bedroom door
Replace toilet wax rings
Repair 2nd floor bathtub faucet and water shut-off valve on 2nd floor toilet
Reinstall transom hardware
Reinstall cupboard facings in kitchen
Install shelves in our linen closet
Install fridge water line
Install dishwashers
Fix dishwashers
Hook up/test stove & oven
Fix kitchen drawer that is jammed shut
Add work lights in basement workshop area
Get airduct sytem cleaned out
Install shower curtain rods
Build basement work tables
Goo-gone stickers off everything
Get city to replace water valve
Get city to replace sidewalk
Get city to remove all the concrete debris from sidewalk replacement
Get city to stump tree
Demo Scary Shed
Fix gutter where it rains over the back door
Patch gutter
Replace gutters
Repair electrical service to garage
Install doorbells
Return doorbells
Install better doorbells
Take a break to punch stuff
Dig out post in back yard
Fill in tiger pit
Finesse deadbolts
Get 3rd electric meter service set up
Basement tool room
Make garage door work
Get garage door remotes, pair w/ garage
Get garage door professionally inspected
Replace garage door motor
Fix garage door again
Replace Garage door
Move paving stones in back yard to south side of house
Board up broken basement windows
Buy and install washer and dryer
Install lattice under front porch stairs
Find tenants
Prepare lease paperwork

the work list for the future is at least as long, but i’m pretty pleased with where we are after the first year. and more importantly, it feels like our home. we’ve sweated, bled, ended up at urgent care for infected thumb injuries, shed a few tears of frustration, learned, succeeded, failed, evicted rodents, punched walls, built pride and ownership, and shared a few well-deserved late afternoon beers on the porch roof overlooking Damen Ave. i wouldn’t trade this drafty old moneypit for a shiny, fully-functional condo for anything. and i couldn’t be more grateful for my partner in this adventure. xoxo.

the moneypit, no 26: the house on Robey Street

last march, there was a frantic week where ben and I spent every night after work salvaging the original oak moulding out of our new house in preparation for the contractor to put up drywall over the irreparably-damaged plaster walls. we pulled a piece of trim down from the dining room windows and noticed that it had something penciled on it in cursive on the back side. “a secret message!” was my first, most logical, thought. we later later parsed it out to read “2939 N Robey.” an address. our address. today, we live on Damen Avenue, but it used to be called Robey (or Robie) Street. in 1927, it was renamed after the influential Jesuit priest Father Damen. so, not really a top secret message as much as it was likely the delivery address for the lumber. still, this lends credibility to our theory that the oak is probably original to the house – we know that it pre-dates 1927 at the very least. and the address gives me a place to start when it comes to researching our house’s history.

secret

anyway, our plans to reinstall the original trim didn’t pan out, nor did our backup plan to sell all the trim to some reclaimed-wood enthusiast, but recently ben has been stripping and reusing some of it for other projects. and so this is what he made me for Christmas:

Untitled

ben dug up this particular piece of trim, traced and preserved the writing, stripped and refinished the wood and built it into this coat rack. now it hangs in the landing just outside our apartment’s front door. how’s that for romantic christmas present?

(of course, the beautiful coat rack just calls attention to the fact that we need to gut the REST of the stairwell (refinish floors and stairs, new drywall, replace crappy motion sensor lights with period-appropriate fixtures and switched control, install trim around doors, strip paint off of transom window, replace handrail…but it’s a place to start. and to hang our coats. and our hearts.)

the moneypit, no 25: closets which are NOT heaps, and a christmas miracle

more closet photos!

over thanksgiving weekend we took on the task of taming the bedroom closet. it had seemed like such a good idea, to have our contractor frame out the closets, and then leave us to build out the shelves. and in truth, it was, as his carpenters never would have had the finish carpentry skills to do what we wanted. but it also meant that it was six months before we had time to turn the closet from a heap of clothes into an actual closet. but, here it is, before, during, after:

sad closet heap:
our closet on a good day

walling off a window that mostly looks out into the light shaft and our neighbor’s back porch. we left the upper portion of the window exposed with the intention of putting a framed piece of stained glass in there later. in the morning, a few highly improbable* shafts of light actually bounce into through window , and i thought that a sparkly, colored window would be kind of fun.

no more window

eddie’s helping. she’s so helpful.

eddie helping

the cleanest, most pristine any closet will ever be in our lives.

after

sadly, our clothes are not the elegant, single-palette, carefully spaced garments of a Container Store advert. on the other hand, or lives are also not that boring.

closet after

we settled into a nice working groove on this project in terms of our respective skillsets, frustration threshold for learning new things, and tolerance for tediousness. i sketch the initial idea. then ben takes that sketch and re-engineers it into something that is actually feasible**. he does most of the heavy carpentry, and i do most of the finishing work. in theatre terms, since this is how i make sense of any project, i was designer and scenic artist, ben was technical director and carpenter.

also! a christmas miracle! out of nowhere, a city landscaping team rolled up this morning and stumped our tree, which basically means they used this crazy machine to pulverize the stump into sawdust in a matter of moments. this was long after i’d given up hope that they’d ever do it (we’ve had a stumping request on file with the city’s 311 system since mid-July). now we can plan a new tree in the spring. or maybe the city will surprise us and plant one for us. an easter miracle, perhaps?

*improbable, given the layout of the building. this window faces east, but faces another brick wall approximately 8 feet away.

** “bah, physics. so the wall is only 8′ and i designed a shelf system that’s 10′. what is the problem?”

the moneypit, no 24: heaps of closets

we are way overdue for another moneypit post. we took a break from working on the house for most of september and october in order to keep up with our actual jobs, run a marathon, and to take a quick anniversary trip to california. but we’ve knocked out a few projects in earnest lately, especially with winter closing in.

1. the linen heap is now a linen closet! this actually makes me happy every time i open the closet. all it took was a trip to the hardware store for paint, then more paint when i ran out, then a trip for shelves and hardware, then another trip for different hardware when that hardware didn’t work and 3 coats of finish on each side of the shelves which seriously which takes more time and planning than kneading, rising and baking a loaf of sourdough artisan bread. let me tell you that a house whose walls are alternately plaster/lath, drywall over plaster/lath, plaster/lath directly over brick, or drywall over studs presents some challenges when it comes to anchoring stuff. i’ve been known to drill exploratory holes in the wall prior to starting a project.

IMG_1775

linen closet, after

2. the storage heap is now a storage room again! (there’s a theme to this post, can you tell?) i found a warehouse in the burbs selling industrial shelving via craigslist. getting 12′ long steel uprights into our mazda 3 hatchback is not for the faint of heart, but tinycar can do anything, and i am stubborn. they cost half as much as the wobbly metal shelving at home depot, and are twice as sturdy. we could store an elephant on these shelves. a compact one, that is. anyway, the feeling of dread that i had every time i went into the storeroom has abated. i’m no longer avoiding projects that require a tool or art supply that had disappeared into the storage room.

storage room, before/after

3. in keeping with this post’s theme, today’s project was storage shelves in the garage, so that that heap could also be wrangled under control just in time for winter. we dusted the snow off the BBQ, fire pit and patio furniture and tucked them away until next may…or june. sniff.

garage shelves - before/after

4. i also fixed a broken basement window in the easiest way possible: by boarding it up. we are slowly but surely repurposing Scary Shed back into the property, one bit of scrap lumber at at time.

easiest way to fix a broken basement window

5. Ben and his dad installed lattice under the porch stairs just in time for Halloween; how else would you disguise the monster under the stairs?

porch lattice, before/after

6. speaking of which, Ben fulfilled HIS homeowner’s dream by setting up a truly impressive haunted house for Halloween. the rig included 4 performers, 2 video projectors, a webcam, laptop, fog machine, a custom-made candy table, and a horse’s head mask. i missed all the fun, of course, because tech ruins everything, but the boys did have a good time scaring children. this video of shifty eyes was projected in the 2nd floor front windows:

Untitled

7. it only took me half the summer and a half dozen posts to DIY plumbing/appliance forums to search for parts, order parts, get the wrong parts, return those parts, order new parts and then take apart the fridge, but i finally managed to install the missing water inlet valve in our refrigerator so that water comes out of the water spigot in the door. fancy! i’ve never had a Fancy Fridge. rental apartments don’t get Fancy Fridges. (as evidenced by the fact that i bought our rental unit a totally boring fridge without any bells or whistles or in-door water spigots). our unit came with a new-but-sat-in-an-abandoned-house-for-four-years bottom-of-the-line “fancy” fridge which was mysteriously missing some key parts. sadly, the ice maker still doesn’t work and i haven’t had time to diagnose the problem. it recently got bumped down to the “someday maybe” section of the house to-do list, so we may just have to soldier on using ice trays. it’s a hard knock life.

fridge water valve, installed

8. our thermostat evolved another phase, from cheap programmable model to Nest. while adjusting the temperature with ap app on my phone is both novel and convenient, i’ve taken to calling out “Nest! I’m cold!” and assuming the the robot overlord will hear my complaints and make immediate adjustments. so far this has not happened, so i’m only so impressed with Nest’s “learning” capabilities. but Ben checked and Nest has an open API, which means that theoretically, we could jail-break our Nest and add voice-activated capability. nerds.

thermostat progression

Untitled

9. finally, we paid someone to replace the gutters on the back of the house, thereby eliminating the backdoor rain curtain (which was a unique, but fairly impractical, feature which comes standard with fixer uppers), we paid someone to install a new garage door motor (but then the rest of the door buckled, we pounded it back into place, and are teetering on the edge of total door failure and replacement), and we paid someone to extend the spigot stem on the shower so that the handle can be attached and we no longer have to explain to houseguests how to operate the shower. all of this was money well spent.

the moneypit, no. 23: backyard WWI reenactments

whew. we’ve been working on the house so much that there isn’t any free time left over on sunday night for a blog post.

here’s a typical tuesday evening for us: ben comes home from work and finds me digging an exploratory trench across the back yard. i’m trying to trace some electrical cables as they leave the garage and re-enter the house, and figure out how they connect, if they connect, what we can re-use or what needs to be scrapped and replaced. while chasing cable and bits of conduit, i trench my way past this ugly metal post that just stands in the back yard. i get curious about whether it is set in concrete piling or just stuck in the ground, and start digging. ben arrives and grabs another shovel. we keep digging. and digging. 2 hours later, with the help of the our neighbor, our neighbor’s sledgehammer, and some cleverly placed lumber left over from the demolition of scary shed, we’ve pulled the post, and the 3′ deep concrete piling*, out of the earth. this also means we’ve dug a 4′ deep pit in the middle of the back yard. it’s after dark, we’re staving, and have no plan for dinner.**

later that night the pit filled with rainwater, so the following morning it looked like nothing but another backyard puddle. we began to think of it as our very own tiger trap, though the chances of capturing a drowned rat were much higher than the chances of catching a tiger.

later that week the pit was integrated with the trench we dug across the yard in preparation for running power from the house to the garage.

after talking to the internet, a fellow stage electrician, reviewing a book, and talking to some actual licensed electricians, we decided that it was better to let a professional run the power instead of risking that we do it wrong and electrocute someone or burn the garage down. as ben puts it, he knows “just enough to be dangerous” when it comes to all things electrical.

then we determined that the trench was in the wrong place. filled it in, dug another one.

it took a month, but eventually we dug the trench in the right place, a very competent (and licensed) electrician came out and ran the cable and conduit. hooray, garage power!***

our backyard WWI-reenactments completed, we filled in the trench yesterday. today it poured rain for a short time in the afternoon, which gave us a chance to reevaluate our backyard drainage situation.

it’s not pretty:

quick mud

this is the view from the back door:

i know technical directors (the guys who make scenery for the theatre, that is) who would kill for a rain curtain that nice. actually, ben created that rain curtain by drilling holes in the gutter. why would he do that? well, because before that, the gutter was backing up and overflowing backwards straight INTO THE WALL and coming out the inside of the enclosed back stairs. hence the black mold (or mold-that-is-colored-black-but-is-not-the-black-mold) it was the far lesser of two evils to flood the back yard than to flood the back stairwell.

and flood the backyard it did. actually, what was worse was that since we re-leveled much of the yard through all our recent trenching activity, there was a steady stream of water racing across the back yard and disappearing underneath the concrete slab of the neighbor’s building, presumably headed straight for their basement. we hastily tried to dam up the flood with paving stones, but i can’t say it was terribly useful. our plan is to deny, deny, deny. and wait for the gutter guy to come out on the 22nd.

one of the challenges in this, and all project management, is determining what projects we CAN do ourselves, and what projects we SHOULD do ourselves. i try to think about it in terms of the level of danger. if we do this ourselves, and do it wrong, will it hurt someone? will it damage the house worse than it was before we did the repair? can we reasonably research the technique or skills through the internet or an acquaintance? can we buy, or borrow, the necessary tools?

for example, i’ve spent a few hours on the plumbing forums of DIY websites recently, figuring out how to hook up a water line to our fridge and how to replace the missing water valve inside the fridge. this is low risk: if i eff this up, chances are that the damage won’t be too great. water will spill on the floor and we (still) won’t have ice. this is a project that i can take on.

on the other hand, the new gutter we need. proper installation requires peeling back the edge of the (brand new) roof, installing the gutter, leveling it, resealing the roof, and ensuring that rain water can’t get inside the wall behind the gutter. all conducted 30 feet in the air. if we do this wrong, one of us could fall off the roof, or we could make it leak (more) inside the back stairwell, or we won’t solve any of our backyard drainage problems. high risk, therefore, this is a good thing for a professional to do.

next comes assigning priority, evaluated roughly in this order:

are we obligated to our rent-paying tenants to address this issue?
how much does it cost?
will completing this project improve our quality of life?
will it add enough appraisable value to the house before we have to refinance to pay for itself?
will it take 30 minutes, a weekend, or a month of weekends?

these assessment tools are essential because of the problem clowns, of course. it’s so easy to fall down the rabbit hole on a project and look up and realize that you’ve just devoted the entire evening to digging up a steel post. was that post really bothering anyone? no. would you rather have installed shelves so the linen heap can finally become a linen closet? yeah, maybe…okay yes. in the context of home repair, i wish for closet shelves above almost all things. and it is ALWAYS number 2 on the priority list. right behind this week’s problem clown.

*what in god’s name was the previous owner using that post for that the foundation had to be engineered so? as i understand it, the previous owner kept us boat in the back yard. maybe, what with all the drainage issues, he had to keep it tied up and anchored?

**it’s any wonder that we end up having whiskey and fries for dinner sometimes.

***next week we’ll finally replace the garage door motor, and then i can again park the car without fear of the manually-operated garage door guillotining the car on the way in.

the moneypit, no 22: zero-sum days

when it comes to the moneypit, Ben and i have been working with concept of zero-sum days lately. if something breaks, but something else gets fixed, then we can consider the day a wash. as long as the rate at which things break isn’t faster than the rate at which they are being repaired, we’re not losing ground. or our sanity.

for example – last weekend we got back from a week of vacation to discover that the garage door motor, after three weeks of faithful service, had given up the ghost*. but, later that night, we figured out that the reason the dishwasher wasn’t really cleaning anything was that we had the “high temp wash” button turned off, so it was just sluicing lukewarm water around on the dishes. so: zero sum day: garage door broke, but the dishwasher washes things now.

on thursday, after several days of heavy rainstorms, i came downstairs to discover black mold** blooming up a 4′ section of drywall on the enclosed back porch. which really shouldn’t have been too surprising given that water has been flowing out of the broken gutter, through scary shed, and running under that piece of drywall down the basement stairs (where, happily there is a drain that we recently had routed out). i spent the morning requesting bids from contractors for the gutter/siding/foundation work that we’ll need, and we bumped the demo of Scary Shed to the top of the to-do list. i’d call that a point for the moneypit. however, later that day we got home and discovered that the city finally turned the gravel pit in our front yard back into sidewalk. point for us. so, zero-sum day.

this weekend was a high-scoring, but ultimately zero-sum game.
point for us: Ben demolished scary shed***:

Untitled

Untitled

surprise concrete!

demolition, chicago-style

point for the moneypit: once we got Scary Shed out of the way, we discovered that power to the garage is run through a 12-gauge household extension cord buried in the back yard.

Untitled

some really quality workmanship:

Untitled

so i’d call that even. Templeton the Rat’s shanty town is no more; but now we need an electrical permit.

*when the garage door technician opened up the back of the motor, he literally swept out a handful of plastic fluff that was the remnants of the stripped out gears.

** i have no idea if it is The Black Mold that you always hear scary things about, or just a Mold That Is Colored Black, but either way we have to get rid of it ASAP.

*** why is it called Scary Shed? because the inside looks like this. and Templeton the Rat lives inside there. also, because we owned the house for a good three months before we had a chance to break the lock on the door and peer inside. during which time there was much speculation about what might be within. some voted for treasure, but more people were predicting bodies. it was neither treasures nor bodies: just some old cupboards, a half-eaten muffin, and a lot of rat poo.

the moneypit, no 21: problem clowns

the thing about living in the middle of a rehab project is that normal household tasks have this tendency to unfold into bigger and more complex projects than originally anticipated. russian nesting tasks. or, or…it’s more like our house is a clown car, stuffed with more problem clowns than you could have believed possible. you open up a closet and out come the problem clowns.

anyway. our bedroom closet still doesn’t have any shelves or clothing rods, meaning that on a good day, after cleaning up, it looks like this*:

our closet on a good day

while trying to find somewhere to put away the clean laundry, i decided to move all of our clothes that we don’t wear often (winter, fancy-dress) into the closet in the spare bedroom/office, which is the only closet that has a clothing rod. as i started hanging things on the rod it became immediately clear that it was too wide a span and that the rod would not bear the weight of everything i wanted to hang in there. it began to bow almost immediately:

Untitled

so i stopped moving clothes. went to home depot. bought a bracket. located the studs. cut a piece of scrap lumber. installed a furring strip. installed the bracket. moved the original holders back by a 1/4″ to meet the 12″ standard because is anything ever installed right in this house? no. reinstalled the bracket, this time with the assistance of a level.**

2 hours later? clothes, neatly organized. it really is nice to live in an apartment where i can just fix things myself if they aren’t right, instead of waiting for a landlord to do it, or just putting up with it. but it’s a spectacular time suck.

* except without the drunk-goggles pano effect. the floorboards don’t really curve like that.

** to do the job right, i should have painted the furring strip before i put it in, and touched up all the paint afterward, but that’s okay because lau is going to come visit and we are going to paint closets suprising colors.

the MoneyPit update, no. 19: patch, paint and repeat

ben and i made certain agreements regarding the house: he would fix toilets, i would handle all paperwork. he will tear off Scary Shed, i will paint the front porch. it’s a combination of playing to our strengths, and enabling us each to avoid the things we hate most.

when it comes to installing trim in the rental unit, our division of labor was such that ben would measure, buy, base paint, cut, and install all the trim and i would fill, patch, sand, and paint it. in the end, our respective tasks took us each about three weekends. ben’s dad helped him for one of those weekends, my mom helped me for one of those. so the labor division was probably pretty even. i worked my way through two audio books in the time it took to fill, patch, sand, caulk, tape, and paint the nearly 1000 linear feet of baseboards and window and door casing (we left crown moulding out of the rental unit entirely – it is a nice touch but there’s only so much time in a day).

here’s the thing about foundations. they are what you build everything else on. seems obvious, right? like all old buildings, ours has settled and nothing is square. and so despite the fact that the drywall is new, the walls bow and curve as much as 1/2″ from top to bottom around a doorway. at first we thought it was just a terrible drywall job, but then i had this epiphany about foundations. since we didn’t do a full gut rehab and take the walls down to the studs, the drywall was installed over the plaster and lathe walls. which are 1) 110 years old, and 2) naturally have curves and imperfections. if you put new drywall over an imperfect foundation, you get an imperfect finished surface. so ben had a lot working against him when it came to mitering corners and installing the trim. even though i made as many as 7 passes over every piece of the same trim, i’m still amazed at just how many feet he managed to cut and install.

since i love process photos, here’s a quick photographic journey of just one of the approximately 7000 corners and joints that i finished in the past month.

1: trim installed with a base coat of paint on it:
1: baseboard and shoe installed

2: fill cracks larger than 1/4″ with an expanding foam:
2: fill large cracks with foam

3: after 24 hours, scrape any excess foam out so that it sits about 1/4″ back from the edge, creating a foundation for the joint compound in the next step:
3: scrape excess foam out

4: use a joint compound like Patch n Paint to fill in every nail hole and imperfection, and to sculpt the missing materials in the corners:
4: fill smaller blemishes with joint compound

5: after another 24 hours, sand away the excess joint compound. with a damp rag, wipe away excess dust, then run a line of acrylic caulk along the gap between the top of the moulding and the wall. if the gap is larger than 1/8″, fill with joint compound, first. then let the caulk sit on top of the JC:
5: caulk top edge against wall

6: tape, unless you’re a professional painter who can get paint only where he wants it. i am not one of those:
6: tape and paint

7: finished:
7: finished

the MoneyPit update, no 18: Giant Toilet Operations

some days, a tiny patch of water-stained ceiling:
Untitled

quickly turns into a Giant Toilet Operation:

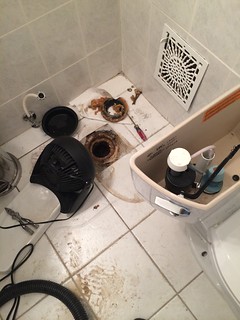
kudos to my husband who reseated two toilets with new wax rings cheerfully and without complaint. for you, my dear, i will write all the leases and mortgage paperwork in the world, if you’ll just fix the toilets.